For the second week, we were introduced to the basic HTML elements. HTML elements are defined using HTML tags. HTML tags are normally come in pairs like <b> and </b>. HTML tags are not case sensitive, but in HTML5, all tags must be in lower case. Below are the simple examples on HTML tags:
1. Basic HTML Tags

2. HTML documents have two part: Head and Body

3. HTML Headings

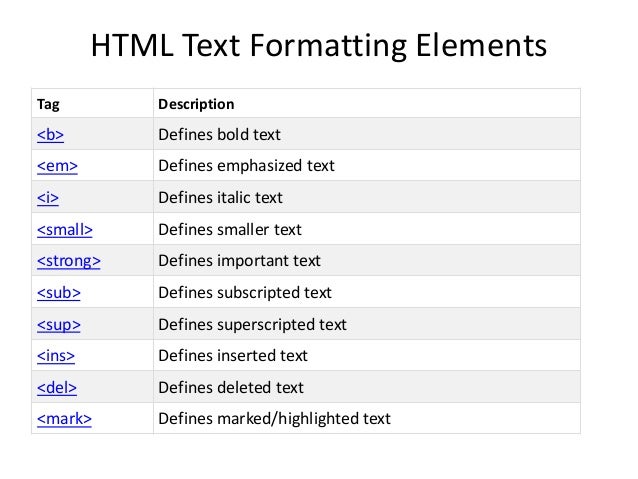
4. HTML Text Elements
5. HTML Image
- Use the HTML <img> element to define an image
- Use the HTML src attribute to define the URL of the image
- Use the HTML alt attribute to define an alternate text for an image, if it cannot be displayed
- Use the HTML width and height attributes to define the size of the image
- Use the CSS width and height properties to define the size of the image (alternatively)
- Use the CSS float property to let the image float
- Use the HTML <map> element to define an image-map
- Use the HTML <area> element to define the clickable areas in the image-map
- Use the HTML <img>'s element usemap attribute to point to an image-map
6. HTML Links and Anchors

7. HTML Unordered List

8. HTML Ordered List

9. HTML Definition List

10. HTML Table Tags

To learn more about HTML, you can refer to this website:
For the lab session
We were asked to continue our previous work by creating
two more pages: Hobby and Experience. Basically we just need two create
two new files which need to save in the same folder and link all the
respective pages.
 |
| Hobby page |
 |
| Experience page |
The link properties for the Hobby button in Homepage
is connected to the hobby.html. Do this for all the files in order to
complete the linkage for the whole site. Alternatively, you can also
link the documents by editing the coding part.

No comments:
Post a Comment