Saturday, 26 March 2016

Week 5

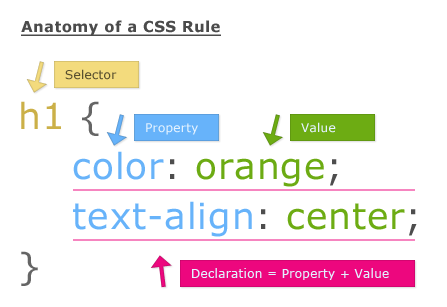
We were introduced on the concept and use of Client Side Script by Dr Syamsul. Cascading Style Sheet (CSS) is a style sheet language that describes the presentation of an HTML (or XML) document. CSS describes how elements must be rendered on screen, on paper, or in other media.

CSS Syntax:


There are three ways of inserting a style sheet into HTML: External, Internal and Inline style sheet.
i.   External Style Sheet: 

  • change the look of an entire website by changing just only one file.
  • Each page must include a reference to the external style sheet file inside the <link> element. The <link> element goes inside the <head> section
ii.  Internal Style Sheet
  • An internal style sheet may be used if one single page has a unique style.
  • Internal styles are defined within the <style> element, inside the <head> section of an HTML page
iii.  Inline Styles
  • An inline style may be used to apply a unique style for a single element.


Lab Session

We were asked to bring our own laptop to the class for the installation of XAMPP. XAMPP is a completely free, easy to install Apache distribution containing MariaDB, PHP, and Perl. The XAMPP open source package has been set up to be incredibly easy to install and to use. Under XAMPP root directory there is a folder called htdocs. That is where we should put the website related stuff. For an example, the folder called lab_HTML_BASIC is created inside htdocs folder and put main.html inside that. Then it can be accessed via the URL http://localhost/lab_HTML_BASIC/main.html.


Saturday, 19 March 2016

Week 4

This week we learn on the concept of client server (Client Side Script & Server Side Script) & Internet Application. Below are the things we have to take note:

There are two parts of scripting languages:
i.   Client-side scripts (css): interpreter by browser
  • eg. JavaScript, Jscript, VBScript
  • Browser dependence
ii.  Server-side scripts (sss): interpreter by web server
  •  e.g. PHP, ASP, ASP.NET, JSP, CGI
  • Browser independence


 There are four layers for Architecture for Internet Application:
  • internet application
  • networked application support
  • transport protocol
  • network transmission/ communication

Client Tier vs Middle Tier vs Information Tier


i.   information tier is basically maintains data for application and stores data in database system
ii.  middle tier implements business logic and presentation logic, act as intermediate between      information tier and application clients.
iii. client tier is an application's user interface and display data to user.


Form, Process and Database are the main parts for an application.
  • Form can be seen on browser and to be filled by users
  • Process is invisible to user, consists many possible language, used to compute transactions
  • Database is not intended to view by the users, consists compatibility issues, form is used to manipulate data


For the lab session

We had our first quiz and done it via online learning.  There are 30 multiple choices questions. I did review back on the questions i got it wrong after i done the quiz.


Thursday, 10 March 2016

Week 3

Learn How to Create HTML Document Form

Forms are used to collect user input.

The main input elements are text box, password box, radio buttons and checked boxes.


1. Text box
 <input type="text" name="myname" size=30 maxlength=40>

2. Password Box
<input type="password" name="pwd" size=15 maxlength=15> 

3. Radio Buttons
 <p> Your favourite brand: <br>

<input type="radio" name="device" value="apple"> Apple <br>
<input type="radio" name="device" value="nokia"> Nokia <br>
<input type="radio" name="device" value="samsung"> Samsung <br> 

</p>

4. Checked Boxes
<p> What devices have you used? <br>
 
<input type="checkbox" name="device" value="apple"> Apple <br>
<input type="checkbox" name="device" value="nokia"> Nokia <br>
<input type="checkbox" name="device" value="samsung"> Samsung <br>
 

</p>

5. Select
<select name="cars">
   <option value="volvo">Volvo</option>
   <option value="saab">Saab</option>
   <option value="fiat">Fiat</option>
   <option value="audi">Audi</option>
</select>

6. Multiples Selections 
<select multiple name="cars">
   <option value="volvo">Volvo</option>
   <option value="saab">Saab</option>
   <option value="fiat">Fiat</option>
   <option value="audi">Audi</option>
</select>

7. Text Area
<textarea name="comments" rows=5 cols=65></textarea>

8.Submit and Reset
<input type="submit" value="Register">
<input type="reset" value="Clear">


Lab Session 

We were asked to create a HTML form based on the example given by our lecturer. This form is created by making a table first followed by adding the intended input elements.

This is the form created by me based on the given paper.


Friday, 4 March 2016

Week 2

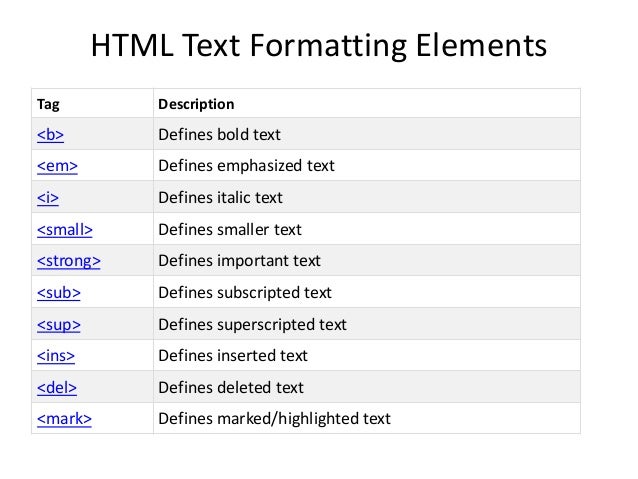
For the second week, we were introduced to the basic HTML elements. HTML elements are defined using  HTML tags. HTML tags are normally come in pairs like <b> and </b>. HTML tags are not case sensitive, but in HTML5, all tags must be in lower case. Below are the simple examples on HTML tags:

1. Basic HTML Tags 
 

2. HTML documents have two part: Head and Body

3. HTML Headings

4. HTML Text Elements
5. HTML Image
  • Use the HTML <img> element to define an image
  • Use the HTML src attribute to define the URL of the image
  • Use the HTML alt attribute to define an alternate text for an image, if it cannot be displayed
  • Use the HTML width and height attributes to define the size of the image
  • Use the CSS width and height properties to define the size of the image (alternatively)
  • Use the CSS float property to let the image float
  • Use the HTML <map> element to define an image-map
  • Use the HTML <area> element to define the clickable areas in the image-map
  • Use the HTML <img>'s element usemap attribute to point to an image-map


6. HTML Links and Anchors

7. HTML Unordered List


8. HTML Ordered List


9. HTML Definition List

10. HTML Table Tags

To learn more about HTML, you can refer to this website:

For the lab session

We were asked to continue our previous work by creating two more pages: Hobby and Experience. Basically we just need two create two new files which need to save in the same folder and link all the respective pages.
Hobby page
Experience page
The link properties for the Hobby button in Homepage is connected to the hobby.html. Do this for all the files in order to complete the linkage for the whole site. Alternatively, you can also link the documents by editing the coding part.